How to save a document as PDF in LibreOffice: the export settings that matter
Export a separate PDF and keep the editable master. Choose the right pages, image settings and archive or accessibility options, then inspect the copy before sending it.
To save a document as PDF in LibreOffice, open the editable source and choose File > Export As > Export as PDF. Set the options, click Export, then choose the PDF's name and location. I'd use this full dialog whenever the page range, print quality or recipient's requirements matter, because quick export skips those choices.
Export a copy and keep the editable master
Start with your document open in the desktop version of Writer, Calc or Impress. The steps use the English menu labels in LibreOffice Help and the 26.2 Writer Guide. Save the editable master before exporting so you have a file to revise later. The export command creates a separate copy and leaves the source document and its format open.
- Choose File > Export As > Export as PDF to open PDF Options.
- On General, select the content to include and the image settings. Choose any required archive, accessibility or form options before continuing.
- Click Export in PDF Options.
- Choose a filename and folder, then click Save on Windows or Linux, or Export on macOS. Open the saved PDF to inspect the result.
In the tabbed interface, choose Export as PDF on the File menu of the File tab to open the same PDF Options. The tab's Export command with PDF selected as the file format also works, but it asks for the output file before the PDF options.
For a routine repeat in Writer, File > Export As > Export Directly as PDF is quicker. It exports the whole document using the most recently selected PDF settings and asks for a filename and location. It doesn't offer a page-range or compression choice. Use the full dialog for a subset, even if the previous export used the pages you wanted.
Include only the pages the recipient needs
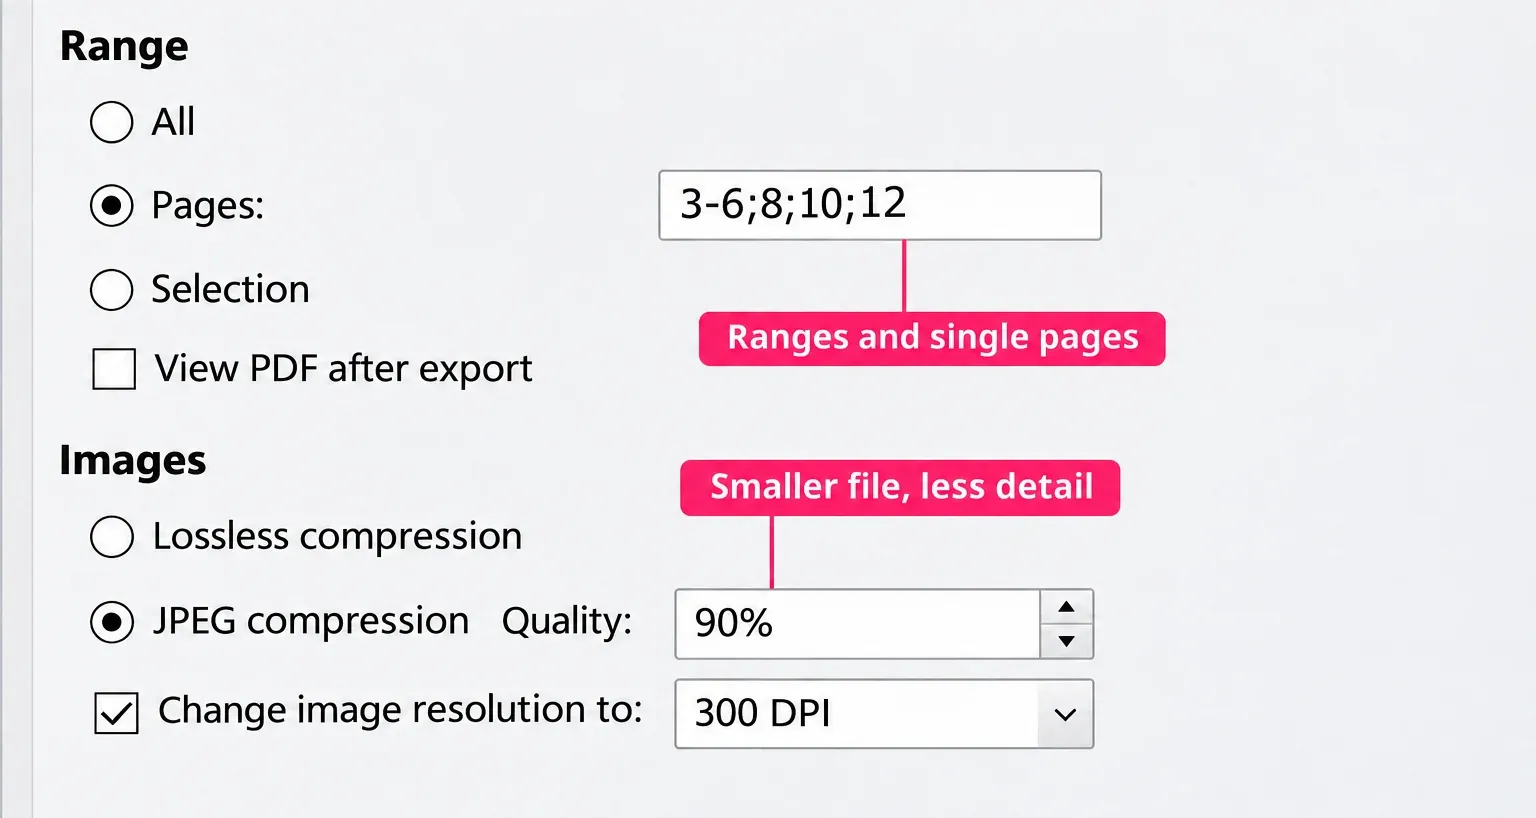
In General, Pages accepts both ranges and individual page numbers. For example, 3-6;8;10;12 includes pages 3 through 6, then pages 8, 10 and 12. The page-range controls also include Selection, which exports the material currently selected. Make that selection in the source document before opening the dialog.
Calc needs an extra check: All exports defined print ranges, or the entire document when none are defined. Review the print ranges before using it for a report. If columns spill onto extra pages, go to the Sheet tab of Format > Page Style, set Scaling mode to Shrink print range(s) to width/height, enter 1 in Width in pages and disable Height in pages so the rows run down as many pages as they need. The scale applies to every sheet that uses that page style. Check File > Print Preview, then export.
Be especially careful with Whole sheet export. It includes every sheet, including hidden sheets, on one PDF page per sheet, ignoring paper sizes and print ranges. I'd leave it off for a selected report or normal paper pagination; hidden working sheets can contain material the recipient shouldn't receive.
Check the app-specific extras too. Writer and Calc comments can be included as PDF annotations; Writer's Comments in margin scales the document content down to make room. In Impress, review Export Notes Page, Export only notes page and Export hidden pages. These content options change the exported copy, so inspect them before sending a presentation or a reviewed draft.
Choose image settings for the recipient
Lossless compression preserves image pixels. JPEG compression trades image detail for a smaller file, with visible artifacts possible at low quality. Change image resolution is a separate control: it resamples images to fewer pixels per inch. A high JPEG quality setting won't restore detail removed by downsampling.
| Purpose | Start with | Inspect before sending |
|---|---|---|
| Email or screen reading | JPEG for photograph-heavy documents; lossless for graphics whose fine detail matters. | File size, readable labels and visible compression artifacts. |
| Printing | The printer's resolution and PDF requirements; avoid unnecessary downsampling. | Small image text, diagrams and the intended page size. |
| Archiving | The receiving archive's required PDF/A profile, then suitable image quality. | The archive's validation result and the retained image detail. |
The Writer Guide's image advice suggests JPEG quality 90 for photographs and at least 300 or 600 dpi for printing, depending on the printer. Those are starting recommendations. Follow the printer's specification and compare the exported image detail before reducing resolution further.
Choose the archive and accessibility options separately
For an archive, select its required profile under PDF Version. Match the profile name the archive requests, such as PDF/A-2b; selecting an archive option doesn't by itself prove that a particular repository will accept the file.
PDF/A is designed for long-term preservation and embeds information needed for faithful reproduction, such as fonts. In LibreOffice, choosing a PDF/A profile disables password protection and warns that an already-set password won't be used. If the recipient requires an encrypted delivery copy as well as an archive file, agree on separate outputs and check each one.
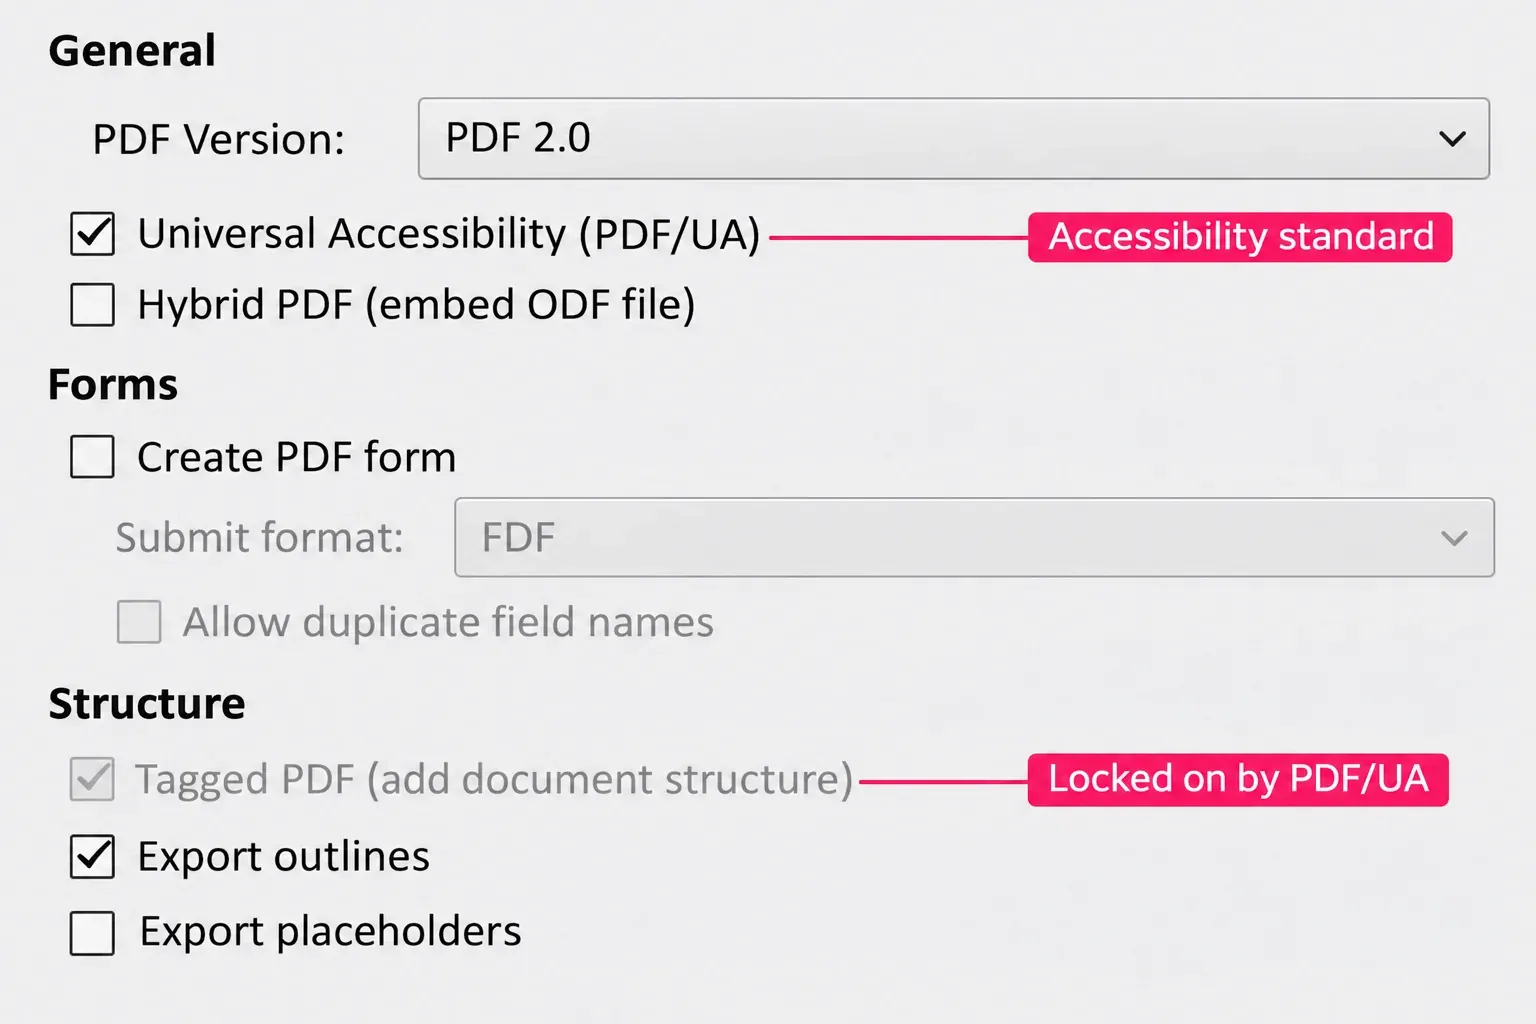
Universal Accessibility (PDF/UA) addresses accessibility. Selecting it enables Tagged PDF and prevents that option being switched off. Tags carry document structure that screen readers can use. The source still needs meaningful structure and alternative text.
In Writer, run Tools > Accessibility Check and repair the issues it identifies before exporting. The check covers problems such as missing alternative text and skipped heading levels. Review the exported file as well; an export checkbox can't repair an unclear reading order or missing descriptions for you.
Keep useful navigation working
Enable Export outlines for heading-based navigation. Writer paragraphs with outline levels 1 through 10 become PDF bookmarks; a paragraph style's name alone doesn't decide this. For example, a Title paragraph with no outline level won't become a heading bookmark through this setting. Build a linked table of contents in the source when the document needs one, then check its entries in the PDF.
Hyperlinks export automatically. On the Links tab, Remove cross-document links excludes external links, so leave it unselected when those links are part of the document's purpose.
Convert document references to PDF targets changes links to other ODF files so they point to PDFs with the same names. It doesn't create those other PDFs. Export the related files separately and keep them available to the recipient; relative file links still depend on the folder arrangement. I'd use ordinary web links for documents that must travel independently, because a link to a file on your computer won't supply that file to someone else.
Send an editable source or a form only when needed
Hybrid PDF (embed ODF file) puts the editable source inside the PDF. Before enabling it, decide whether the recipient should receive that master. A hybrid file displays as a PDF and remains editable in LibreOffice. I'd leave the option off for a finished reading copy and send the agreed editing format separately when a return copy is needed.
Create PDF form exports a fillable PDF form from actual form controls in the document. Ordinary typed labels or placeholder fields don't become form controls by checking this box. The form export settings offer FDF, PDF, HTML or XML as the submit format. Choose the format required by the receiving workflow; the setting doesn't supply a submission service.
Review Allow duplicate field names deliberately. If it's disabled, LibreOffice exports fields with generated unique names. Open the result in the recipient's intended viewer and check that the fields can be filled, saved and submitted as required. If the workflow also needs an archive copy, agree on its PDF/A profile and validation separately from the copy used for filling and submission.
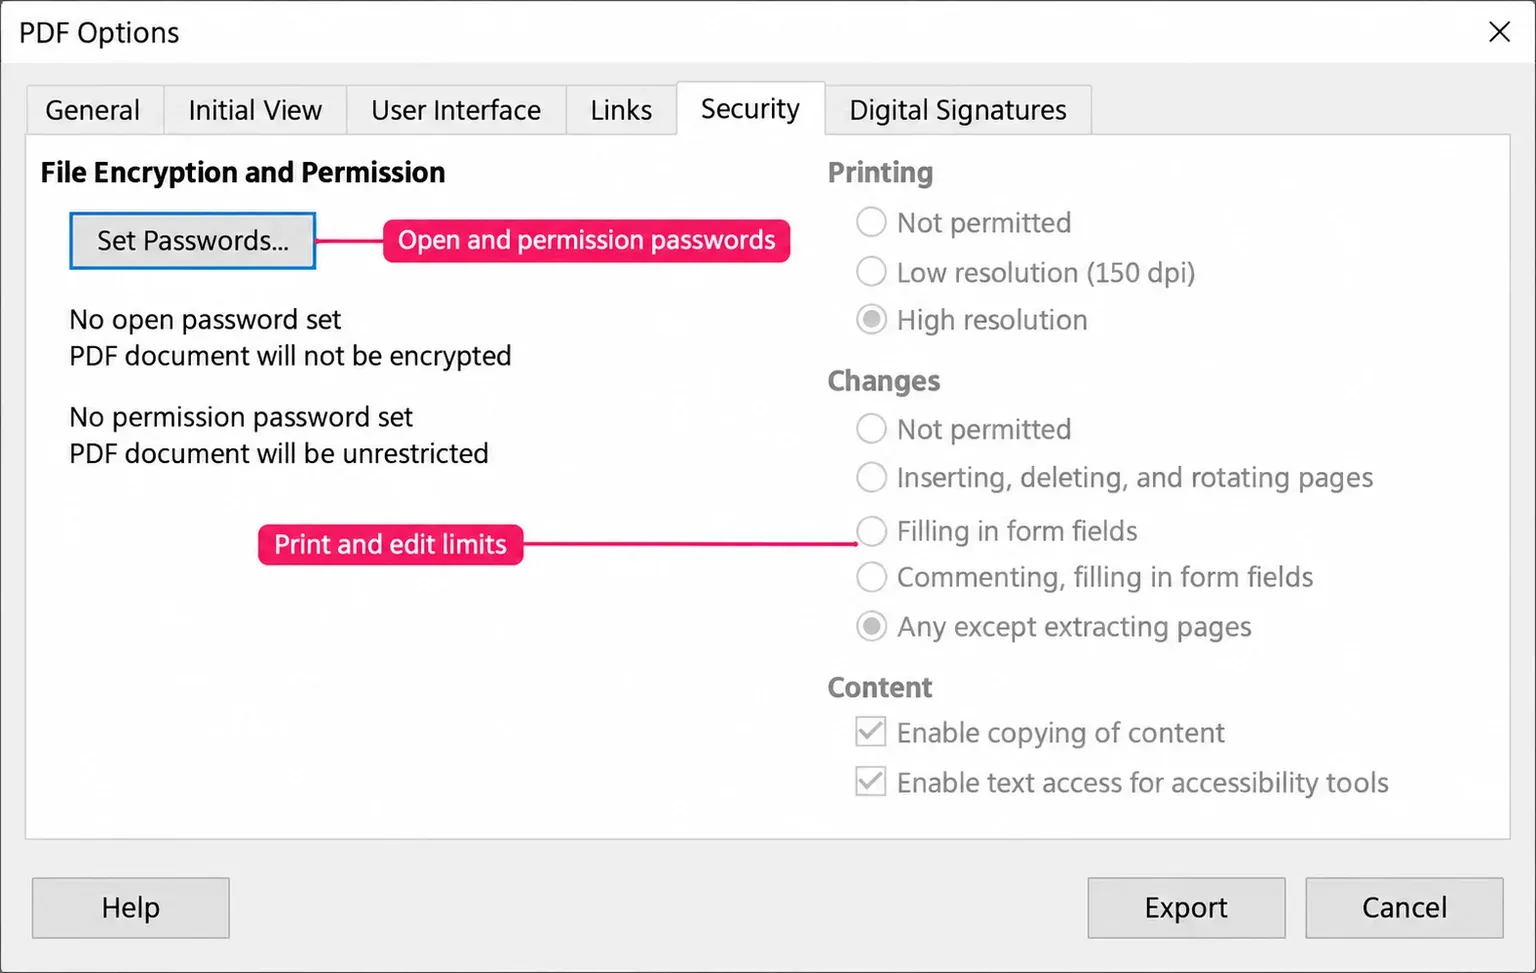
For an ordinary PDF, the Security tab distinguishes a password needed to open the file from restrictions on printing or editing. PDF readers enforce those restrictions differently. Exporting to PDF doesn't make a document tamper-proof. Remove material the recipient shouldn't have from the source copy before exporting.
Open the exported file before sending it
Select View PDF after export to open the result in your default PDF viewer. Check the output against the job you need it to do:
- Confirm the page count and the first and last pages, including any selected range.
- Inspect page breaks, small text and image detail at the size the recipient will use.
- Click the contents entries and links that the reader needs.
- Look for comments, notes or hidden content that shouldn't travel with the file.
- For a form, fill and save a copy in the intended viewer; for an archive, run the receiving archive's required validation.
If something is wrong, change the editable master and export again. Use editing a PDF in Draw for the separate task of correcting an existing PDF. For a document that will come back with edits, agree on the return format before sending it; sharing with Microsoft Office users needs its own compatibility checks.
