How to create a database in LibreOffice Base
File > New > Database, two related tables, a form, a low-stock query and a report: a first Base database you can finish in one sitting, with the Java and backup steps that trip people up.

To create a database in LibreOffice, open File > New > Database, create a local database file, then define its tables before building a form or query. For a first example, use two small tables: categories and the items belonging to them. That gives you one relationship, a form for entering stock, a query that finds low quantities and a report built from that query.
Start with a new local database file
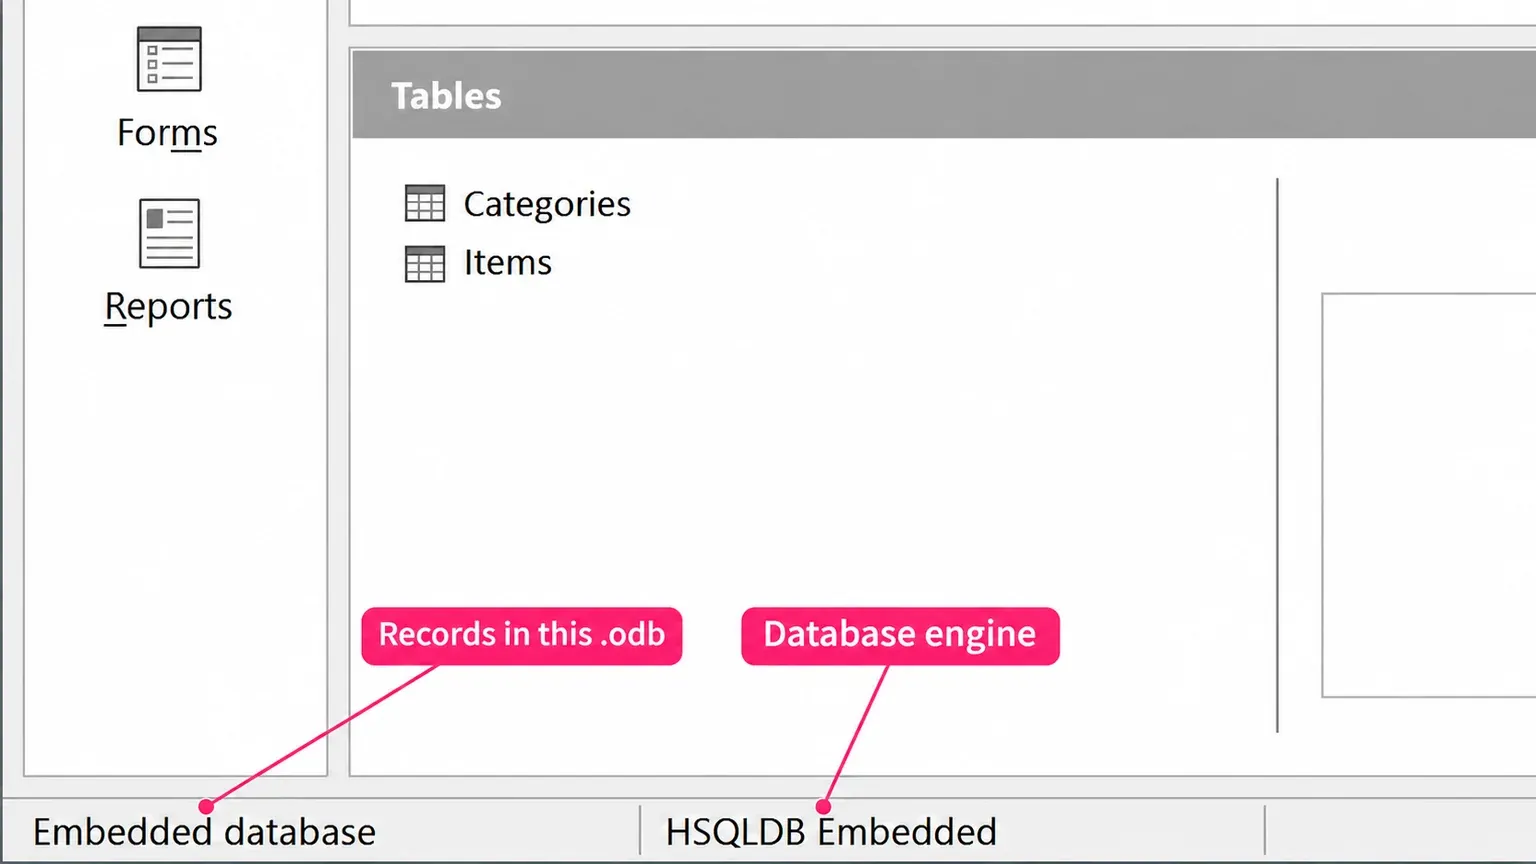
This exercise uses a local HSQLDB Embedded database for one person's practice. The Database Wizard lets you create a database or connect to an existing one, and a new database uses the HSQL engine by default. Menu labels below follow LibreOffice 26.8 and 26.2 Help; the release notes list 26.8.2 as the Latest release and 26.2.7 as the Previous line recommended for enterprises.
HSQLDB and Base's report tools need Java, so set it up before step 1, as the Base setup instructions describe. Open Tools > Options > LibreOffice > Advanced (on macOS, LibreOffice > Preferences > LibreOffice > Advanced), select Use a Java runtime environment and pick an installed runtime that matches your LibreOffice build: a 64-bit JRE for 64-bit LibreOffice. The Advanced options Help warns that the list can take a minute to fill and that some systems need a restart before the change takes effect. Once it's set, the runtime's path shows beneath the list. On a Mac, the macOS Java requirement calls for a JDK. A shared multi-user database needs a different setup from this local exercise.
- Choose File > New > Database. Select Create a new database and choose HSQLDB Embedded in the Embedded database list.
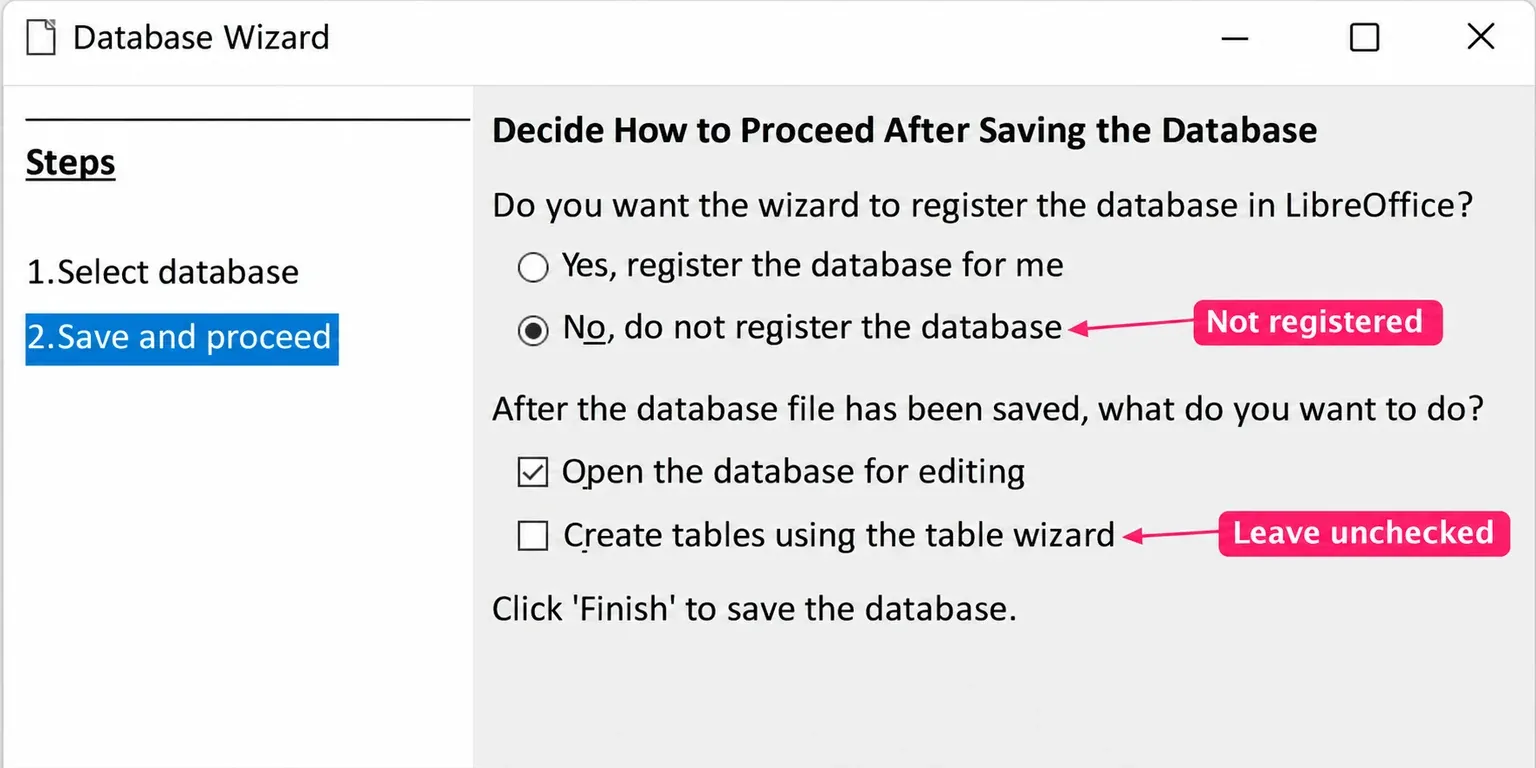
- On Save and proceed, choose No, do not register the database for this standalone exercise. Select Open the database for editing. Leave Create tables using the table wizard unchecked because the next section uses Design View.
- Click Finish, choose a folder you can find again, and save the file as
OfficeStock.odb.
The registration choice controls whether the database is registered with your copy of LibreOffice for other components to use. It isn't account registration or an upload. Leave it unregistered for this standalone exercise; register it later if Writer or Calc needs it as a data source.
If Base, Java or HSQLDB Embedded is missing
No Database entry under File > New on Linux. Base often comes as a separate package from your distribution. On Ubuntu 24.04 that's libreoffice-base, which recommends the default Java runtime and LibreOffice's Java support files and suggests libreoffice-report-builder for database reports. Install all of them from the same package source as the rest of the suite, then reopen LibreOffice: File > New > Database is now in the menu.
The Java runtime list stays empty. Install a runtime that matches your LibreOffice build (a JDK on a Mac), click Add, choose the runtime's root folder and restart LibreOffice. When its path shows beneath the list, go back to step 1. The Mac App Store edition is the exception: its App Store listing says that version can't support Java functionality. For this exercise, use the download from libreoffice.org instead.
HSQLDB Embedded isn't in the list. Choose Firebird Embedded. The two tables, the relationship and the low-stock query still work there: Base Guide 7.2 writes its HSQLDB examples so that most functions carry straight over to Firebird, and Firebird has the INTEGER and VARCHAR types this design uses. Pick those two from the Field type list. The Form Wizard and Report Wizard still run on Java, though, so a copy that can't use Java, like the App Store edition, stops at the form step. I'd switch to the libreoffice.org download rather than finish half the exercise, because the form and the report are the parts you'll use every day.
Define two tables with clear keys
I'd keep category names in their own table because several items can share one category without repeating its name in every item record. A primary key identifies one record; the matching field in the other table is a foreign key. The names and numbers below are sample data to type in yourself.
| Table | Field | Type and purpose |
|---|---|---|
| Categories | CategoryID | Integer; primary key |
| Categories | CategoryName | Text; category name |
| Items | ItemID | Integer; primary key |
| Items | ItemName | Text; item name |
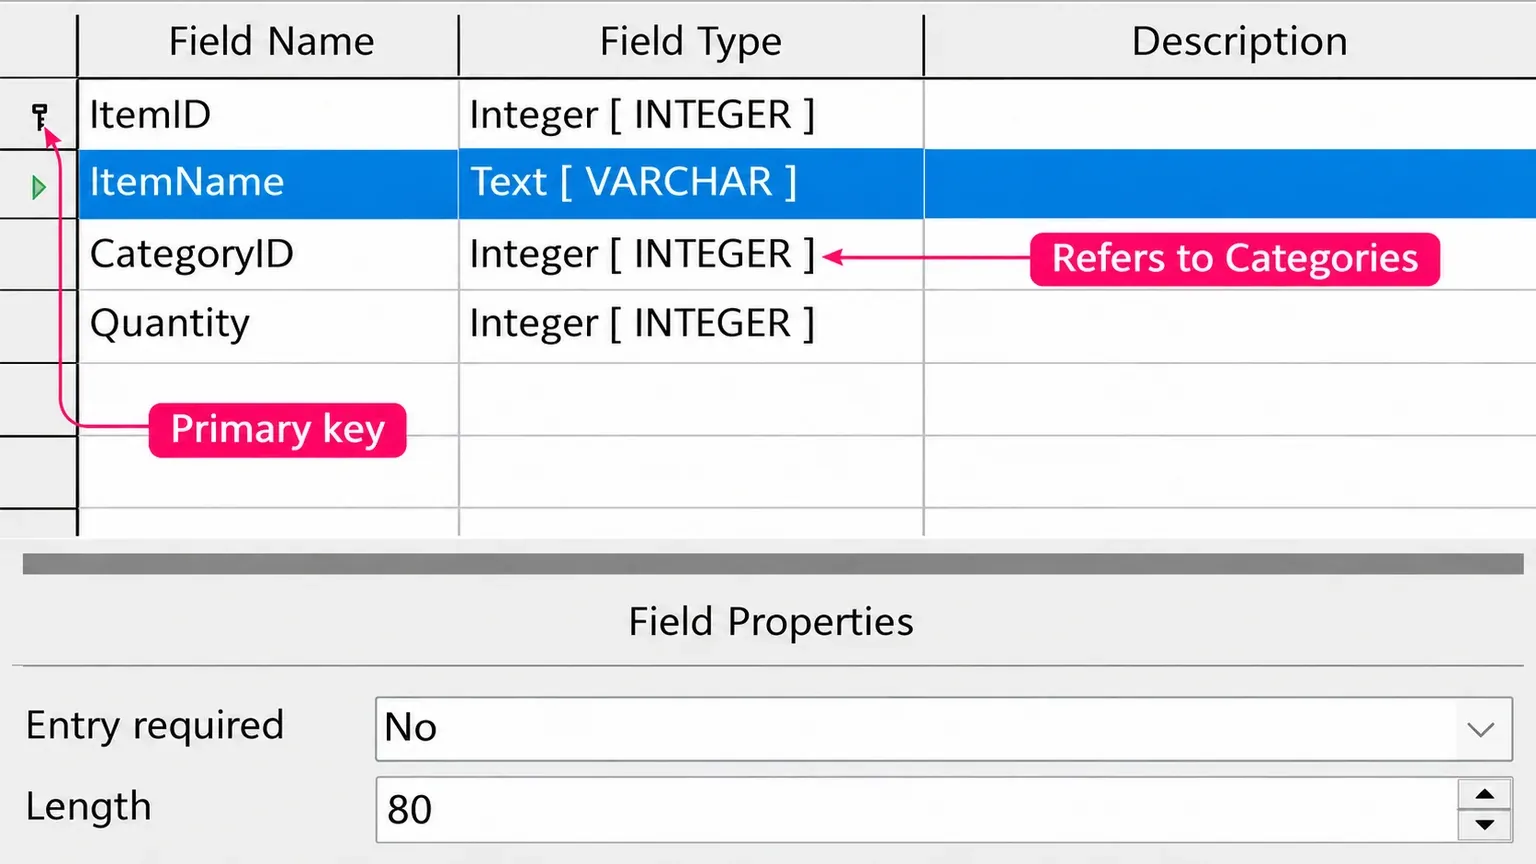
| Items | CategoryID | Integer; refers to CategoryID in Categories |
| Items | Quantity | Integer; whole items in stock |
- In the database window, select Tables > Create Table in Design View. In Field Name, enter
CategoryIDand choose Integer [INTEGER] in Field type. - For this example, use manually entered IDs. On the HSQLDB route, leave AutoValue set to No. Right-click the row header beside CategoryID and select Primary Key; a key symbol appears in front of the field.
- Add
CategoryNamewith Text [VARCHAR], the default type. A text length of 80 is ample for the example names. Use File > Save and name the tableCategories, then close its design window. - Create
Itemsin the same way, with the four fields shown above. Set ItemID as its primary key. Its CategoryID is an ordinary integer field, not a second primary key. Give ItemName a text length of 80.
The Table Design controls offer only the field types your database engine supports. Keep both CategoryID fields on Integer [INTEGER], the same type on both sides. Save the main database file as well as each table definition.
Link the matching CategoryID fields
Create the relationship before entering the practice rows. The Relationships command operates on the database itself, so use this new practice file and close the table-design windows first. Relationship support requires a relational database.
- In the main database window, choose Tools > Relationships.
- Use Add Tables to add Categories and Items to the relationship window.
- Drag Categories.CategoryID onto Items.CategoryID. A line now joins the two CategoryID fields.
Keep the delete behavior conservative. Double-click that line to open the Relations dialog, select No action under Delete options and leave Delete cascade alone: it deletes every item whose CategoryID points at a deleted category, and Help asks you to use it with great care. Click OK, then save and close the relationship window.
Open Categories and enter the two records 1, Stationery and 2, Equipment. Then open Items and enter these records, using the existing category numbers:
| ItemID | ItemName | CategoryID | Quantity |
|---|---|---|---|
| 101 | Notebook | 1 | 12 |
| 102 | Stapler | 1 | 2 |
| 103 | Monitor | 2 | 1 |
Each primary-key value must identify a different record. CategoryID repeats in Items because more than one item can belong to Stationery. Once you move off the last row, the Items table shows all three records. If Base rejects a row, look for a repeated ItemID or a CategoryID other than 1 or 2, and fix the value rather than the table design.
Build a form for entering items
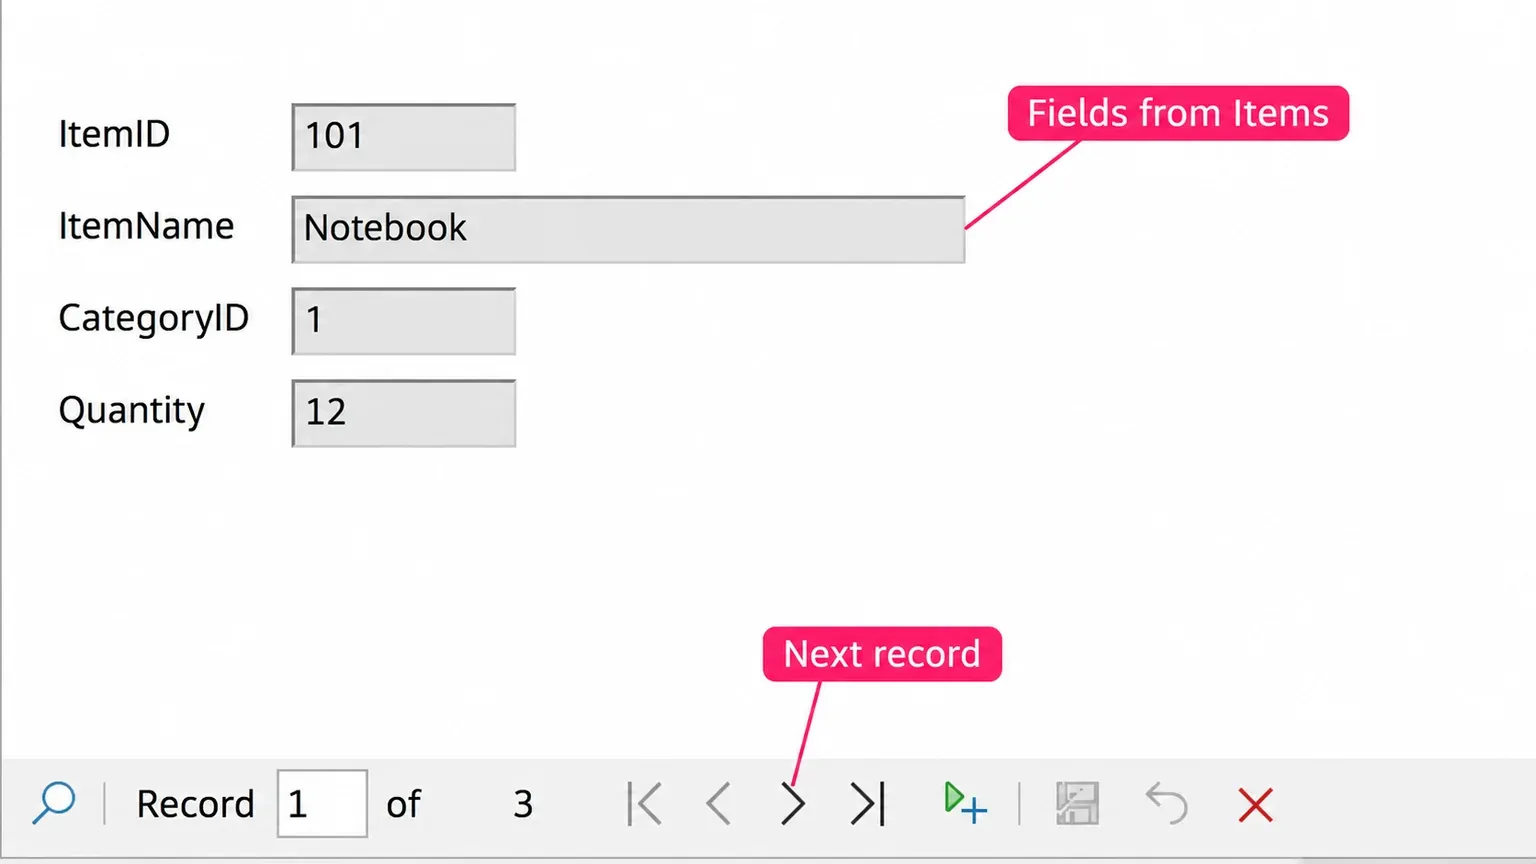
A form presents table fields as controls for viewing and entering records. It doesn't create a second, independent stock list. In the database window, choose Forms > Use Wizard to Create Form, following the Form Wizard.
- In Tables or queries, select Items. Move ItemID, ItemName, CategoryID and Quantity into Fields in the form.
- Keep this first form without a subform. Choose a layout that makes its four labels easy to read.
- At Set Data Entry, select The form is to display all data. This shows existing records and lets you add new ones. Leave Do not allow addition of new data unselected so you can enter stock.
- Name the form
ItemEntry, choose Work with the form, and complete the wizard.
The data-entry setting matters when a new form looks empty: the new-data-only option deliberately hides existing records. With all data displayed, the record-navigation controls step through Notebook, Stapler and Monitor, showing the same values as the Items table. Keep typing numeric CategoryID values for now; a category-name selection box is a later form-design improvement.
Find items with a quantity below three
A query gives a named view of records matching your conditions. Select Queries > Create Query in Design View. Add the Items table when prompted, then use the Query Design grid:
- Double-click ItemName and Quantity in the table box to add them to the lower grid.
- In the Criteria row beneath Quantity, enter
<3. Keep both fields visible. - Press F5 to run the query. The results appear above the grid: Stapler with 2 and Monitor with 1. Notebook, with 12, doesn't match.
- Use the Save icon and name the query
LowStock.
If you see any other rows, make sure <3 sits in the Criteria cell under Quantity, not ItemName, and that the saved quantities are 12, 2 and 1, then press F5 again.
Turn the query into a report
Close the query window, select Reports > Use Wizard to Create Report, and choose LowStock as the query supplying its fields. The Report Wizard lets you select labels, grouping, sorting and layout. Include ItemName and Quantity, skip grouping for this short list, and sort by ItemName if you want alphabetical order.
On the final page, enter a title such as Low stock. Choose Dynamic report when opening the report should use the current data, or Static report for a fixed snapshot. Select Create report now and click Finish. Base saves the report and opens it read-only in Writer, listing Stapler and Monitor. The static and dynamic options decide what a later opening shows: a dynamic report picks up the current quantities, while a static one keeps the data from the day you created it.
Save the database and protect its actual data
Save open design objects and the main OfficeStock.odb file, close the database, then copy the file to a dated backup before experimenting with table structures, relationships or engine migration. On the embedded HSQLDB route the records live inside the .odb file itself, as Base Guide 7.2 explains, so that one closed copy holds every record.
An .odb file connected to an external database holds only the forms, queries, reports and a link to the records, as Base's database-file overview explains, so back up that database with its own tools too. The Base overview covers when an external database is the better fit, and the rest of the site's Base guides are grouped in one section.